Carol R. Eaton Designs

Carol R. Eaton Designs

FABRIC FOR SALE: click on pages below!

Monday, July 29, 2013

Thermofax Screens: Shore Birds!

I recently purchased a bunch of thermofax screens designed and created by Terri Stegmiller. She is an awesome artist with a wonderful whimsical style! I encourage you all to take a peek at her work and stop by her Etsy shop.

I've been trying to carve out time to experiment and had my first go with a bird design over the weekend. I love watching shore birds running along the oceans edge trying to grab a bite to eat before the next wave comes in. I had some fabric on hand that I call my "Under the Sea" series which seemed made for the addition of the birds.

Of course I ran out of time to fully create a design but I'm playing with companion fabrics and think I will end up mounting the piece on foam board vs. the more traditional hanging sleeve... to be continued!

Auditioning Fabrics

5 sweet little birds
I think I can create definition with stitching so the birds pop off the fabric!

Maybe this will work?!
I'm sure I'll spend the week looking at the design wall and trying other fabrics and who knows... maybe the end result will be completely different. That's the fun of creating art!

Sunday, July 28, 2013

Hand Painted Fabric: Fine Tuning a Technique!

I'm intrigued with propping fabric up and painting it to see where the colors will meander and blend! I had a chance to play around yesterday morning and I feel that I'm fine tuning the image in my head to what happens on the fabric.

I'm narrowing down my "likes" to propping the fabric up with 2.5 quart plastic containers (like the kind you use to line a paint bucket) or 32 ounce yogurt containers. I'm using Seta Color paints from Dharma Trading Co.

... more play time scheduled for this afternoon!
 
Garden Variety
Hand Painted Cotton

Garden Variety - Detail
Hand Painted Cotton
 

Friday, July 26, 2013

Painted Canvas and Applique!

I've been painting on canvas with typical fabric paints just to explore and have fun. The canvas is a little unusual - it's very dense and even after washing there seems to be a bit of finish left on the surface. Not to be discouraged I kept on painting! This particular piece grabbed my attention making me stop painting and start designing. The colors and shapes on the fabric are playful and reminded me to be free!

I instantly wanted to design a very simple vase with flowers that left the appearance of a sketch rather than a well developed subject. It was refreshing to be fluid and free with the design and a pleasure to go into the studio to work on it. To finish the piece I mounted on canvas stretchers.


Flowers at Play
20" X 15"
 
 
Here is the painted canvas before I started


Detail of the flowers with just a hint of color
 

This photo shows the free motion quilting in the background

Friday, July 19, 2013

Awesome Technique!

Most of you know I am curating a traveling exhibit, Color Wheel of Emotions which opens in August. I created a Facebook page dedicated to bringing the readers into the world of the artists by sharing interviews, tips and techniques. Recently I shared Peggy Brown's unique approach and it's just so cool that I wanted to share with you as well! Please feel free to go to the Facebook page to read more and view the artists stunning artwork... it's a treat!
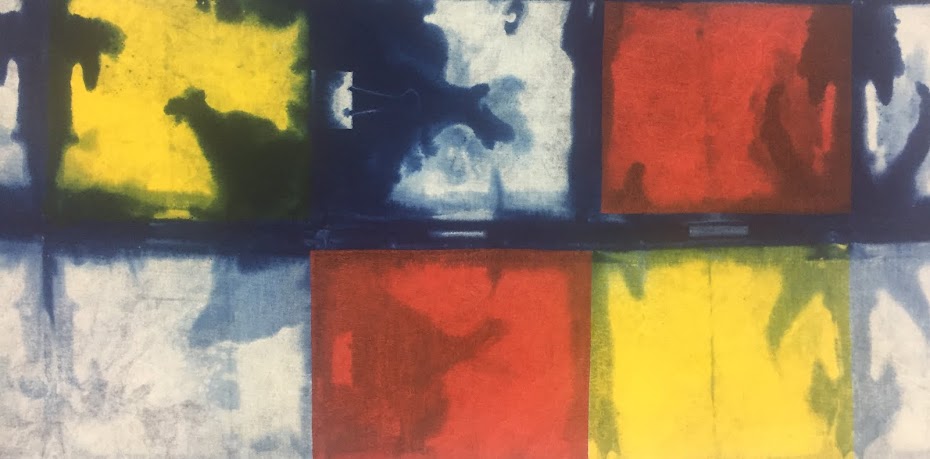

Changing Colors III
 
Peggy Brown Shares Her Techniques for Combining Mediums! 

I want to thank Peggy for sharing her techniques with us. The end results are beautiful and with her fearless approach perhaps other artists will venture into the arena of combining mediums for unexpected results!  

PB: The materials used to create “Changing Colors III” include archival tissue paper, cotton flannel, a few pieces of silver leaf and  interfacing - all painted with transparent watercolor paint. The darker pieces which compose the center of interest are digital transfers which I fused to the painted background and edged with hand embroidered blanket stitch.  The image in the transfers (which in this case is mostly just textured color) was cropped from one of my watercolor paintings (on paper) using Photoshop to crop and print on treated fabric.

The process: I started with the three orangeish paper sections. I tore pieces of archival tissue paper, placed them on a painting support board, and sprayed them with water until wet thru. Next I painted them with watercolor and let everything dry flat on the support board. The paper and paint worked together to make various textures and the pigments ran and blended.  I never know how a piece is going to look until it is dry - watercolor does wonderful things when left to be itself!  (Refer to photo of Peggy in her studio in below photo) 

When dry I fused the painted tissue to larger pieces of cotton flannel and repainted everything including the whitish sections. When dry I gave the paper parts a coating of Acrylic Mat Medium. 

The next step in the process included fusing the strips of interfacing you see on the sides of the paper sections. I cannot remember if I painted them first or after they were applied to the flannel but either would work. Then I fused my center of interest - the darker transferred pieces.  Lastly I quilted thru everything. The paper doesn't tear because the mat medium makes it strong. Please visit my website gallery for more examples of my work.

 
Peggy Brown happily creating in her studio!  
 
Please "like" our Facebook page!
 

 World Quilt Show - New England XII
700 Elm Street, Manchester, NH
August 15 - 18!


Tuesday, July 16, 2013

Confetti Dyeing - Working Outside!

The price of having fun with dyes!
I love working outside and despite the record heat I've been getting outside to mess around with the dyes! I decided to create some confetti dyed projects. I chose 4 yards but will only show you a few. The others went into the "to be continued" pile.


Purple, Yellow and Raspberry
The dye is sprinkled across the surface of the fabric.
I hung the fabric on the line and sprayed with soda ash and water to allow the dye to blend and meander down the surface.

Detail

Pink and Blue Stripes

Look at the variety of dye particles in this piece!
 The pieces that went into the "to be continued" pile need more pizazz. I may over dye with ice or maybe experiment with batik... as I said - to be continued!

Saturday, July 13, 2013

Creating Textures with Fabric Paint

Do you ever have an idea that gets lodged in your brain and keeps twirling around and coming back in different forms? This keeps happening to me with the idea on how to create texture on fabric. I seriously lay in bed in the wee hours of the morning thinking about various ways I can make this happen. I jump out of bed at 5 am and head to the studio to see if I can translate my idea into reality!

As I mentioned in previous posts I'm reconnecting with my fabric paints and having a great time. I'd forgotten how instantly paints give you results... you're able to watch the colors migrate forming really fun and unexpected results.

In this post I'll share results from last weeks play time...

Elevating the Fabric


Folded Fabric

Elevating the Fabric


Elevating the Fabric
Canvas Fabric

Ice Cube Manipulation

Elevating the Fabric

Color Wheel of Emotions Exhibit ~ August 15!


Exhibit catalogues available click here: SAQA store!
 
 
I am so delighted to have my first nationally curated exhibit ready to open! The Color Wheel of Emotions show premiers at the WORLD QUILT SHOW: NEW ENGLAND, August 15 – 18, 2013. I’ll share updates as the exhibit travels the US and hopefully you will have the opportunity to view this wonderful exhibit in your community. If you can get to the grand opening at 700 Elm Street, Manchester, NH in August I promise it will be a treat!
 
The Color Wheel of Emotions has it's own FaceBook page and each week I’ll bring you exclusive interviews with the 19 artists juried into the show. They allow us to peek into their studios and learn more about their approach to creating art. The interviews bring out the artists personalities complete with tips, humor and inspiration! Please click this link and “LIKE” our page. Check back frequently to learn more about the artists.
 
We have a limited supply of exhibit catalogues available at the SAQA store for purchase. Be sure to order early before it's too late!


Wednesday, July 10, 2013

Creating Texture with Fabric Paint

I've had a delightful time experimenting with ways to create texture using fabric paint! The summer weather has lured me outside so I've started to become attached to my fabric paints again. I still LOVE my dyes but I want to take advantage of the season by working outside.

My first experiment was to use the same colors but manipulate the fabric differently each time. By keeping the colors consistent it allowed me to create a base point for comparison.... to see what worked and what didn't. The exercise was fun and got me thinking in various directions. I have all kinds of ideas taking shape in my head and can't wait to get back outside to play again!

Fabric was scrunched with ice cubes played randomly across the surface. Once the fabric was heat seat I painted a light blue wash across the fabric and scrunched again. 

Detail of scrunched fabric

The fabric was folded before painting. Salt was added randomly
to encourage paint movement.

Detail of folded fabric

It took a few sessions before I felt this piece was done. I started by painting large shapes onto the fabric. When they dried I painted a wash of bright green across the surface and scrunched the fabric. Next I painted another wash of light purple and scrunched again. Lastly, I sponged random circles of paint here and there to balance out the design.

Detail of triple painted piece